9. Integration examples
9.1. OTP Authentication with Apache2
There are two possible RADIUS authentication modules for Apache2. mod_auth_radius is packed with the FreeRADIUS server. mod_auth_xradius can be downloaded from http://outoforder.cc.
Previous versions of mod_auth_radius had the problem to not work with OTPs, but this is now fixed in the current version.
This describes the use with mod_auth_xradius.
Note
If you do not want to use RADIUS, you can also use the module mod_authn_linotp, which is available on github.
9.1.1. Download
Go to http://www.outoforder.cc/projects and download apr_memcache and mod_auth_xradius. You will also need to install apache2-prefork-dev , apache2-utils , libmemcache-dev and libapreq2- dev [1]
| [1] | These are Debian package names. On other distributions the names may vary. |
9.1.2. Compile
First you need to compile apr_memcache. The authentication module uses the memcache client to talk to the memcached daemon.
In the apr_memcache source directory a:
./configure prefix=/usr
make && make install
should do.
Now you can compile mod_auth_xradius:
./configure --with-apxs=/usr/bin/apxs2
make && make install
9.1.3. Configuration
Now you need to assure, that the memcached daemon is started at system boot time. There are different ways depending on your distribution.
Your Apache2 configuration might look like this:
LoadModule auth_xradius_module /usr/lib/apache2/modules/mod_auth_xradius.so
AuthXRadiusCache memcache "127.0.0.1:11211"
## 10h Timeout in seconds.
AuthXRadiusCacheTimeout 36000
<VirtualHost *>
  ServerName secret-site3
  ServerAdmin webmaster@localhost
  DocumentRoot /var/www/secure
  <Directory /var/www/secure/>
     Options Indexes FollowSymLinks MultiViews
     AllowOverride None
     Order allow,deny
     allow from all
     AuthType Basic
     require valid-user
     AuthBasicProvider xradius
     AuthName "Please enter your username and OTP-Password and OTP-PIN"
     AuthXRadiusAddServer "localhost:1812" "testing123"
     AuthXRadiusTimeout 7
     AuthXRadiusRetries 2
  </Directory>
  ErrorLog /var/log/apache2/error.log
  LogLevel debug
  CustomLog /var/log/apache2/access.log combined
  ServerSignature On
</VirtualHost>
9.2. Firewall integration
One common scenario is to use one time passwords for remote access via SSL VPNs. In case of the Astaro Security Gateway it could look like this.
Within Users → Authentication → Servers you need to add your LinOTP host. (see Configure Astaro Security Gateway. Add LinOTP host.)
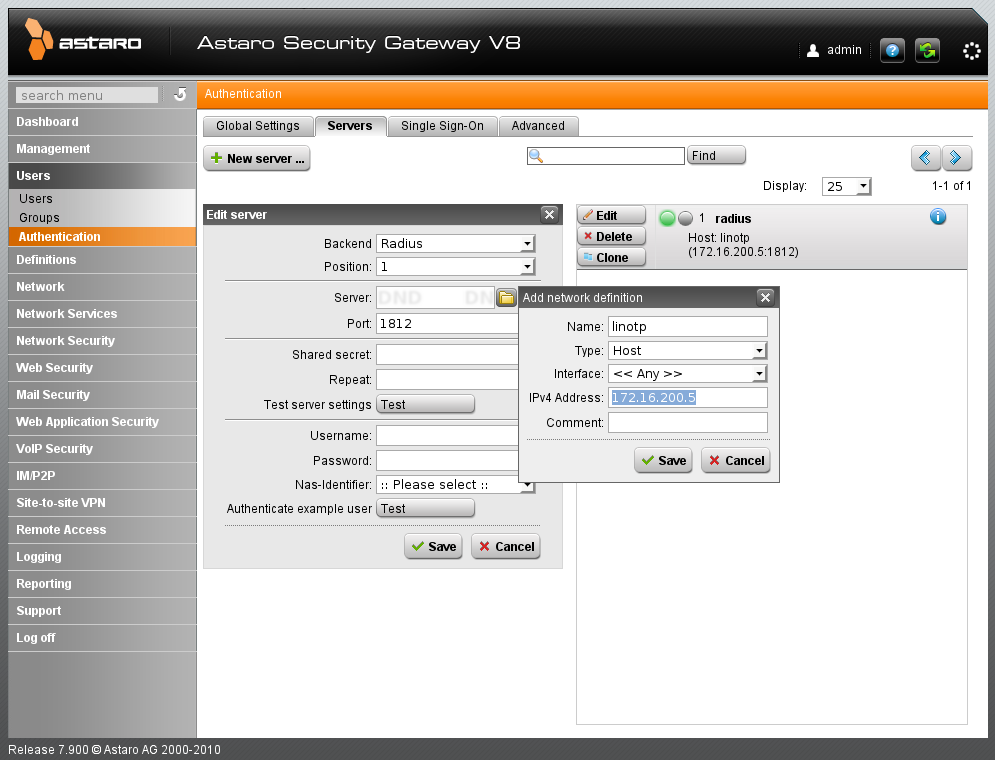
Configure Astaro Security Gateway. Add LinOTP host.
Choose “RADIUS” for the new server and enter the shared secret that was configured on the RADIUS server on your LinOTP machine. (see Configure Astaro Security Gateway. Enter RADIUS shared secret.)
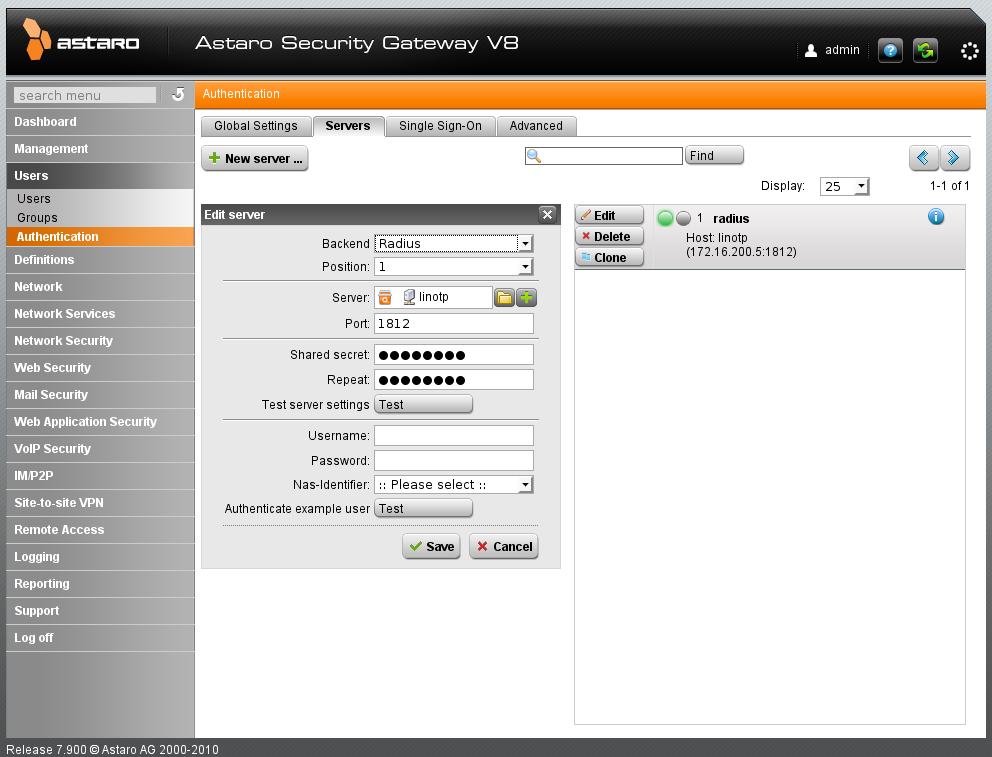
Configure Astaro Security Gateway. Enter RADIUS shared secret.
You may now test your setup by entering a valid username and its corresponding OTP PIN and OTP value.
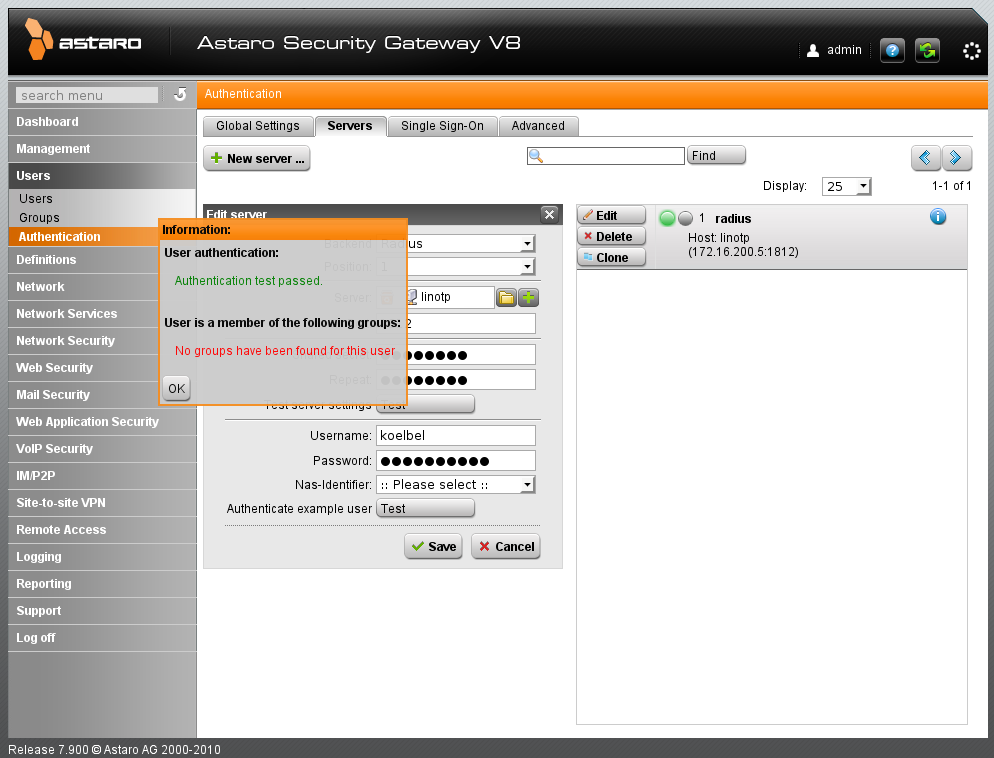
Configure Astaro Security Gateway. Test your setup.
You are now ready to use this setup to bind the authentication to the users. (see Configure Astaro Security Gateway. Test your setup.)
Note
With the FreeRADIUS module of LinOTP 2.2 mschapv2 is not supported. Thus OTP can only be used for SSL VPN but not for PPTP.
9.3. Authentication with third party OTP solutions
If you need to authenticate users with existing tokens, that are not supported by LinOTP you can setup the FreeRADIUS server to decide, if a user is authenticated against LinOTP or the other solution like RSA SecurID(R) or other unsupported token systems.
A common scenario is to have the FreeRADIUS server check, if a user is a member of a certain LDAP [2] group.
| [2] | Of course, this also works for Active Directory. |
By putting users in certain LDAP groups, you can define which backend system should authenticate the user:
If the user is either a member of this group you could have the request handled by LinOTP. If the user is not a member of this group the authentication request can be forwarded to another RADIUS server.
In the below example we will use the reverse logic and forward the authentication request to another 3rd party RADIUS server, if the user is a member of this group.
9.3.1. Configure FreeRADIUS LDAP
First you need to define the LDAP connection of your FreeRADIUS server.
Edit the file /etc/freeradius/modules/ldap like this:
ldap instance1 {
     #
     #  Note that this needs to match the name in the LDAP
     #  server certificate, if you're using ldaps.
     server = "172.16.200.61"
     # The DN of the user you are using to authenticate
     identity = "cn=admin,ou=linotp,dc=linotp-test,dc=local"
     password = your_password
     # BaseDN to search the users
     basedn = "ou=linotp2,dc=linotp-test,dc=local"
     filter = "(sAMAccountName=%{%{Stripped-User-Name}:-%{User-Name}})"
     #  How many connections to keep open to the LDAP server.
     #  This saves time over opening a new LDAP socket for
     #  every authentication request.
     ldap_connections_number = 5
     # seconds to wait for LDAP query to finish. default: 20
     timeout = 4
     #  seconds LDAP server has to process the query (server-side
     #  time limit). default: 20
     #
     #  LDAP_OPT_TIMELIMIT is set to this value.
     timelimit = 3
     #
     #  seconds to wait for response of the server. (network
     #   failures) default: 10
     #
     #  LDAP_OPT_NETWORK_TIMEOUT is set to this value.
     net_timeout = 1
     tls {
             start_tls = no
     }
     dictionary_mapping = ${confdir}/ldap.attrmap
     edir_account_policy_check = no
     groupmembership_filter = "(&(objectClass=group)(member=%{control:Ldap-UserDn}))"
}
You can define many different ldap instances by repeating the ldap block multiple times.
9.3.2. Configure FreeRADIUS proxy
In a RADIUS sense the third party server is a RADIUS proxy. Thus we need to define such a proxy in the file /etc/freeradius/proxy.conf:
realm FARWARDSERVER {
     authhost = 3rd.party.server:1812
     accthost = 3rd.party.server:1813
     secret   = radius-secret
}
LinOTP’s FreeRADIUS needs to be configured as a RADIUS client on the 3rd party server. The 3rd party server and the RADIUS secret need to be configured in the above config file.
9.3.3. Configure proxy decision
Finally we need to confiugre the decision in which case the request is handled by LinOTP and in which case the request will be handled by the 3rd party server. This is done by adapting the authorize section in /etc/freeradius/sites-enabled/linotp:
authorize {
   [...]
   #
   # put the ldap instance here
   #
   instance1

   if ( instance1-Ldap-Group == "cn=3rdpartyusers,ou=linotp,dc=linotp-test,dc=local" ) {
     update control {
         Proxy-To-Realm = "FORWARDSERVER"
     }
   }
}
Then all users that are member of the group 3rdpartyusers will be forwarded to the 3rd party servers and all other users will be authenticated by LinOTP.
If you need to define more complex conditions take a look at the FreeRADIUS unlang [3].
| [3] | http://freeradius.org/radiusd/man/unlang.html |
9.4. Restrict access to certain devices to certain users
Note
You should also check the authorization policy (Authorization), if you want to configure this behaviour in LinOTP.
This integration example describes howto configure the FreeRADIUS this way, that only users from certain LDAP-Groups or Active Directory Security Groups are allowed to login to certain devices, i.e. RADIUS clients.
9.4.1. Install LDAP FreeRADIUS module
You need to install an addtional FreeRADIUS module “freeradius_ldap”.
9.4.2. Adapt the configuration
You need to adapt the following configuration files:
/etc/freeradius/modules/ldap
/etc/freeradius/clients.conf
/etc/freeradius/policy.conf
/etc/freeradius/sites-enabled/linotp
9.4.3. modules/ldap
In this file your LDAP connection to your Active Directory is configured:
ldap {
     #
     #  Note that this needs to match the name in the LDAP
     #  server certificate, if you're using ldaps.
     server = "172.16.200.61"
     # The DN of the user you are using to authenticate
     identity = "cn=admin,ou=linotp,dc=linotp-test,dc=local"
     password = your_password
     # BaseDN to search the users
     basedn = "ou=linotp2,dc=linotp-test,dc=local"
     filter = "(sAMAccountName=%{%{Stripped-User-Name}:-%{User-Name}})"
     #  How many connections to keep open to the LDAP server.
     #  This saves time over opening a new LDAP socket for
     #  every authentication request.
     ldap_connections_number = 5
     # seconds to wait for LDAP query to finish. default: 20
     timeout = 4
     #  seconds LDAP server has to process the query (server-side
     #  time limit). default: 20
     #
     #  LDAP_OPT_TIMELIMIT is set to this value.
     timelimit = 3
     #
     #  seconds to wait for response of the server. (network
     #   failures) default: 10
     #
     #  LDAP_OPT_NETWORK_TIMEOUT is set to this value.
     net_timeout = 1
     tls {
             start_tls = no
     }
     dictionary_mapping = ${confdir}/ldap.attrmap
     edir_account_policy_check = no
     groupmembership_filter = "(&(objectClass=group)(member=%{control:Ldap-UserDn}))"
}
The groupmembership_filter is needed, otherwise the Matching for Ldap-Groups will not work.
9.4.4. clients.conf
Within the clients configuration, you may add a shortname to each client definition. We will need this shortname later for doing regexp on it:
client localclients {
     ipaddr = 172.16.200.0
     netmask = 24
     secret = testing123
     shortname = ImportantHosts
}
In this example the complete subnet 172.16.200.0/24 will be referred to as “ImportantHosts”.
9.4.5. policy.conf
In the file /etc/freeradius/policy.conf several policies can be defined. You need to define one or more of your own policies.
A policy checks for certain conditions. In this example, first it is checked, if the client, that issues the RADIUS Request is an ImportantHost. If so, it is checked, if the user contained in the RADIUS Request is in the given LDAP group. If the user is not in the LDAP group, the RADIUS Request is rejected:
my_policy {
 if (FreeRadius-Client-Shortname =~ /^Important/) {
     # if the user is NO poweruse, he will be rejected - even before authenticating the user
     if ( Ldap-Group != "cn=poweruser,ou=linotp,dc=linotp-test,dc=local" ) {
         reject
     }
 }
}
Thus only users in the LDAP group “poweruser” are authorized to login to “ImportantHosts”.
9.4.6. site-enabled/linotp
In the file /etc/freeradius/site-enabled/linotp you need to add some things to the authorize{} section. The authorize{} section is processed before the authenticate{} section.
The command update request will add an Attribute to the RADIUS Request. In this case, the Client-Shortname which is exactly the shortname definition from the clients.conf is added as FreeRADIUS-Client-Shortname Attribute. The FreeRADIUS-Client-Shortname can thus be used within conditions in the policy.conf:
authorize {
 ...
 update request {
     FreeRADIUS-Client-Shortname = "%{Client-Shortname}"
 }
 ldap
 my_policy
 ...
}
Then you need to load the ldap module, which is required for doing the LDAP group matching in the policy.conf.
Finally you will call the policy “my_policy” or also several defined policies.
So a user can be rejected in the authorize{} section based on the policies before the user will be even authenticated and before the LinOTP server will be contacted.
9.5. Map certain RADIUS clients to specific LinOTP realms
Note
If you are runnning the LinOTP appliance you can configure this in the RADIUS settings.
This integration example aims to explain howto authenticate users to different realms depending on the RADIUS clients.
9.5.1. Example Data
In this example there are two networks with RADIUS clients:
network_a: 192.168.0.0/24
network_b: 10.0.0.0/16
Users from network_a are to authenticate in realm_a and users in network_b are to authenticate in realm_b.
9.5.2. Configuration
Now we are going to configure the RADIUS server with the LinOTP module, so that this will work smoothly. This can also done in a redundant manner. We define two instances.
In the LinOTP module configuration file /etc/freeradius/modules/linotp you need to define two LinOTP instances:
linotp2 LinOTPinstance1 {
   validateurl = https://linotpserver/validate/simplecheck
   sslhostnameverify = yes
   sslcertverify = yes
   realm = realm_a
}

linotp2 LinOTPinstance2 {
   validateurl = https://linotpserver/validate/simplecheck
   sslhostnameverify = yes
   sslcertverify = yes
   realm = realm_b
}
9.5.3. Define two client networks
Now we define the two client networks. In the file /etc/freeradius/clients.conf we define these networks with a client-shortname:
client localclients1 {
        ipaddr = 192.168.0.0
        netmask = 24
        secret = testing123
        shortname = network_a
}

client localclients2 {
        ipaddr = 10.0.0.0
        netmask = 16
        secret = testing123
        shortname = network_b
}
9.5.4. Define the mapping policy
In the file /etc/freeradius/policy.conf we define the policy, that maps the networks to the LinOTP instances:
pol_net {
     if (FreeRadius-Client-Shortname =~ /^network_a/) {
        redundant {
                LinOTPinstance1
        }
    }
    else {
        if (FreeRadius-Client-Shortname =~ /^network_b/) {
            redundant {
                LinOTPinstance2
            }
        }
    }
}
9.5.5. Add the shortname to the request
In /etc/freeradius/sites-enabled/linotp add the following to the authorize section. This will add the client shortname according to clients.conf to the RADIUS request:
authorize {
    [...]
    update request {
            FreeRADIUS-Client-Shortname = "%{Client-Shortname}"
    }
    [...]
}
9.5.6. Activate policy during authentication
In the file /etc/freeradius/site-enabled/linotp we need to call the policy. Therfor you need to change the section authenticate:
authenticate {
    # comment out linotp2
    #linotp2

   AuthType     Auth-Type LinOTP2 {
        pol_net
    }
    [...]
}
You can also add redundancy by adding more LinOTP instances on other machines. These instances then need to go to the policy definition in the redundant statement:
redundant { LinOTPinstance1 LinOTPinstance1b LinOTPinstance1c }
9.6. Authenticating RADIUS clients that pass the ntdomain
There may be RADIUS clients, that send the username in the form of:
NTDOMAIN\username
and the FreeRADIUS server of LinOTP will respond with a invalid character in username.
To split the username and pass it to the LinOTP server, you need to edit the file /etc/freeradius/sites-enabled/linotp.
In the sections authorize{} and preacct{} you will find a line that says suffix. This line defines, that the RADIUS server will remove suffixes deviced by the @-sign. Add lines, so that it looks like this:
IPASS
suffix
ntdomain
Now the domain from the following notations will be removed:
NTDOMAIN\username
username@domain
domain/username
Finally you need to add such a realm with the name of the ntdomain to the bottom of the file /etc/freeradius/proxy.conf like this:
realm YOURREALM {
}
9.7. LinOTP and MIT Kerberos
Warning
This example does not give you an introduction to kerberos. Unless you have a certain knowledge of kerberos and MIT Kerberos, you should not read this. Providing any basic introduction to kerberos is out of the scope of this documentation. As a starting point you should read the kerberos documentation http://web.mit.edu/kerberos/krb5-devel/doc/ “For Users” and “For Administrators”.
Starting with version 1.12 MIT Kerberos comes with support for OTPoverRADIUS. By the time of writing 1.12 was not released, yet, so you need to get the sources from github:
git clone https://github.com/krb5/krb5
apt-get install libcurl4-openssl-dev
apt-get install autoconf automake make yacc
autoreconf -i
util/reconf
./configure
make all
To verify, if your kerberos was compiled with OTP support, check for the following files:
./lib/krb5/krb/preauth_otp.so
./plugins/preauth/otp/otp_state.so
After that, install the kerberos system:
make install
You need to create a krb config file /etc/krb5.conf flike this:
[libdefaults]
   default_realm = TEST.LSEXPERTS.DE

[realms]
   TEST.LSEXPERTS.DE = {
   kdc = kerberos
   admin_server = kerberos
  }

[logging]
   kdc = FILE:/var/log/krb5kdc.log
   admin_server = FILE:/var/log/kadmin.log
   default = FILE:/var/log/krb5lib.log
and a kdc config file /usr/local/var/krb5kdc/kdc.conf:
[kdcdefaults]
   kdc_ports = 750,88

[realms]
   TEST.LSEXPERTS.DE = {
      database_name = /usr/local/var/krb5kdc/principal
      acl_file = /usr/local/var/krb5kdc/kadm5.acl
      key_stash_file = /usr/local/var/krb5kdc/.k5.TEST.LSEXPERTS.DE
      kdc_ports = 750,88
      max_life = 10h 0m 0s
      max_renewable_life = 7d 0h 0m 0s
}
Run:
kdb5_util create -r TEST.LSEXPERTS.DE -s
Create the administrator:
# kadmin.local
Authenticating as principal root/admin@TEST.LSEXPERTS.DE with password.
kadmin.local:  addprinc admin/admin@TEST.LSEXPERTS.DE
WARNING: no policy specified for admin/admin@TEST.LSEXPERTS.DE; defaulting to no policy
Enter password for principal "admin/admin@TEST.LSEXPERTS.DE":
Re-enter password for principal "admin/admin@TEST.LSEXPERTS.DE":
Principal "admin/admin@TEST.LSEXPERTS.DE" created.
kadmin.local:  quit
Start the daemons:
/usr/local/sbin/krb5kdc
/usr/local/sbin/kadmind
With the kadmin-tool you need to configure preauthentication for those users, who should use OTP:
modify_pricipal +requires_preauth otpuser
9.7.1. Setting up OTP with Kerberos
Basic information can be found at the MIT Kerbers Wiki [4].
| [4] | http://k5wiki.kerberos.org/wiki/Projects/OTPOverRADIUS |
To enable OTP for a user you need to set an OTP-string in kadmin:
set_string otpuser otp [{}]
If you set the otp-string to [{}] then the default OTP configuration will be used. The default OTP configuration can be set up in the config file /usr/local/var/krb5kdc/kdc.conf:
[otp]
   DEFAULT = {
      server = your-lintop-server:1812
      secret = your-radius-secret
      strip_realm = true
}
9.7.2. Setting up FAST
As the OTP value is wired to the KDC, we need to setup FAST [5]. For this the client needs a ticket to encrypt the tunnel.
For this every ticket on the client could be used. For convenience and as it plays nice with pam_krb5, we set up anonymous PKINIT. In anonymous PKINIT only the KDC will get a server certificate. The clients and users do not need a certificate, which makes the certificate handling not very complex.
You need to create a user WELLKNOWN/ANONYMOUS create a CA and the KDC certificate and change /etc/krb5.conf on the KDC and on the clients:
[realms]
   TEST.LSEXPERTS.DE = {
   kdc = kerberos
   admin_server = kerberos
   pkinit_anchors = FILE:/root/CA/cacert.pem
}
On the KDC you also need to provide the private key and thus configure /usr/local/var/krb5kdc/kdc.conf like this:
[kdcdefaults]
kdc_ports = 750,88
pkinit_identity = FILE:/root/CA/kdc.pem,/root/CA/kdckey.pem
pkinit_anchors = FILE:/root/CA/cacert.pem
Please refer to [6] for setting up anonymous PKINIT.
| [5] | Flexibale Authentication Secure Tunneling |
| [6] | http://web.mit.edu/kerberos/krb5-latest/doc/admin/pkinit.html#anonymous-pkinit |
9.8. Deny access for disabled users in Active Directory
A user in Active Directory has the attribute userAcountControl.
The difference between a normal user account and a locked user is the following:
-userAccountControl: 514
+userAccountControl: 512
This attribute holds many different flags. Microsoft has an article on that [7].
You may do an ldapsearch in those bit fields [8].
Users, that are locked, can be found like this:
ldapsearch -x -W -H ldap://172.16.200.61 \
      -D "cn=administrator,ou=linotp,dc=linotp-test,dc=local" \
      -b "ou=linotp,dc=linotp-test,dc=local" \
      "(&(SAMAccountName=*)(objectClass=user)(userAccountControl:1.2.840.113556.1.4.803:=2))"
Users, that are not locked, can be found like this:
ldapsearch -x -W -H ldap://172.16.200.61
      -D "cn=administrator,ou=linotp,dc=linotp-test,dc=local" \
      -b "ou=linotp,dc=linotp-test,dc=local" \
      '(&(SAMAccountName=*)(objectClass=user)(!(userAccountControl:1.2.840.113556.1.4.803:=2)))'
This search pattern can be used in the UserFilter and SearchFilter in the LDAPUserIdResolvers of LinOTP, so that locked users will not be found for authenticating and thus will not be able to authenticate.
| [7] | http://support.microsoft.com/?scid=kb%3Ben-us%3B305144&x=15&y=14 |
| [8] | http://www.selfadsi.de/ldap-filter.htm#BitAndOr |
9.9. Use LDAPs in UserIdResolvers
The LinOTP2 server may fetch its users from an LDAP server or Active Directory. These servers might be running LDAPS, which means, the LDAP server has a certificate installed and the communication will be encrypted. In case of Active Directory, the domain controllers would have a domain controller certificate installed.
To make this work properly, you need to do the following steps.
In the LDAP UserIdResolver configuration you need to enter the LDAP URI like:
ldaps://yourserver.domain.tld
i.e. “ldaps” marks that the ldap connections should be encrypted and you need to provide the FQDN of the server. The FQDN must match the CN in the certificate. You need to copy the CA certificate, that signed the certificate of your LDAP server/ domain controller to your LinOTP2 server. Copy it to the directory /etc/ssl/certs/ using your preferred scp client like WinSCP.
The certificate needs to be in the base64 encoded PEM format. If you copied the certificate from a Microsoft CA, it will probably be in the binary DER format. You can convert the certificate on the LinOTP2 server:
openssl x509 -in /etc/ssl/certs/yourCA.der -inform DER -out /etc/ssl/certs/yourCA.pem
Now you need to tell the ldap client that will connect to your LDAP server or Active Directory to trust this certificate. This can be done by adding the following line to the file /etc/ldap/ldap.conf:
TLS_CACERT /etc/ssl/certs/ca.crt
Then restart the Apache server:
/etc/init.d/apache2 restart
9.10. Configure a redundant MySQL database with master-master-replication
This installation example is based on two LinOTP-servers both installed on a debian or ubuntu system with the LinOTP packages. One server is called linotpserver1 and the other one linotpserver2.
9.10.1. Introduction
When setting up the master master replication, you should stop the apache2 server on both machines:
/etc/init.d/apache2 stop
The encryption key must be the same on both machines, so copy one to the other:
root@linotpserver1:~# scp /etc/linotp2/encKey root@linotpserver2:/etc/linotp2/
The MySQL server needs to listen on the external IP and not only on localhost, so you need to comment the bind-address in /etc/mysql/my.conf on both machines:
#
# Instead of skip-networking the default is now to listen only on
# localhost which is more compatible and is not less secure.
#bind-address           = 127.0.0.1
Restart the MySQL servers and check with netstat:
netstat -tulpen
tcp        0      0 0.0.0.0:3306            0.0.0.0:*               LISTEN      103        4722        973/mysqld
9.10.2. Replication user
On both machines, we need to setup a replication user:
root@linotpserver1:~# mysql -u root -p
Enter password:
Welcome to the MySQL monitor.  Commands end with ; or \g.
Your MySQL connection id is 38
Server version: 5.1.41-3ubuntu12.9 (Ubuntu)

Type 'help;' or '\h' for help. Type '\c' to clear the current input statement.

mysql> GRANT REPLICATION SLAVE ON *.* TO 'repl2_user'@'linotpserver2' IDENTIFIED BY 'secretPW';
Query OK, 0 rows affected (0.00 sec)

mysql> FLUSH PRIVILEGES;
Query OK, 0 rows affected (0.00 sec)

mysql> quit;
Do the same on linotpserver2:
root@linotpserver2:~# mysql -u root -p
Enter password:
Welcome to the MySQL monitor.  Commands end with ; or \g.
Your MySQL connection id is 40
Server version: 5.1.41-3ubuntu12.9 (Ubuntu)

Type 'help;' or '\h' for help. Type '\c' to clear the current input statement.

mysql> GRANT REPLICATION SLAVE ON *.* TO 'repl1_user'@'linotpserver1' IDENTIFIED BY 'secretPW';
Query OK, 0 rows affected (0.00 sec)

mysql> FLUSH PRIVILEGES;
Query OK, 0 rows affected (0.00 sec)

mysql> quit;
9.10.3. Configure replication
Now we need to configure the replication. For this we edit the file /etc/mysql/my.conf again and add the following values to the seciton [mysqld].
On linotpserver1:
# replication
server-id = 1
replicate-same-server-id = 0
auto-increment-increment = 2
auto-increment-offset = 1
master-host = linotpserver2
master-user = repl1_user
master-password = secretPW
master-connect-retry = 60
replicate-do-db = LinOTP2
log-bin = /var/log/mysql/mysql-bin.log
binlog-do-db = LinOTP2
relay-log = /var/lib/mysql/slave-relay.log
relay-log-index = /var/lib/mysql/slave-relay-log.index
On linotpserver2:
# replication
server-id = 2
replicate-same-server-id = 0
auto-increment-increment = 2
auto-increment-offset = 2
master-host = linotpserver1
master-user = repl2_user
master-password = secretPW
master-connect-retry = 60
replicate-do-db = LinOTP2
log-bin = /var/log/mysql/mysql-bin.log
binlog-do-db = LinOTP2
relay-log = /var/lib/mysql/slave-relay.log
relay-log-index = /var/lib/mysql/slave-relay-log.index
The auto increment increment is set to 2, as we have two servers. Each server starts its autoincrement with a different offset.
If you have already a filled database, you should lock the old database and dump the old, existing database and import it to the new, second database (e.g. copy the contents of the old database to the new replication).
If this is a new installation, we can go on like this.
9.10.4. Setup slaves
On linotpserver1:
root@linotpserver1:~# mysql -u root -p
Enter password:
Welcome to the MySQL monitor.  Commands end with ; or \g.
Your MySQL connection id is 48
Server version: 5.1.41-3ubuntu12.9-log (Ubuntu)

Type 'help;' or '\h' for help. Type '\c' to clear the current input statement.

mysql> use LinOTP2;
Reading table information for completion of table and column names
You can turn off this feature to get a quicker startup with -A

Database changed
mysql> FLUSH TABLES WITH READ LOCK;
Query OK, 0 rows affected (0.04 sec)

mysql> SHOW MASTER STATUS;
+------------------+----------+--------------+------------------+
| File             | Position | Binlog_Do_DB | Binlog_Ignore_DB |
+------------------+----------+--------------+------------------+
| mysql-bin.000001 |      106 | LinOTP2      |                  |
+------------------+----------+--------------+------------------+
1 row in set (0.00 sec)

mysql> UNLOCK TABLES;
Note
You need to remember the “File” and the “Position” for later use.
On linotpserver2:
root@linotpserver2:~# mysql -p -u root
Enter password:
Welcome to the MySQL monitor.  Commands end with ; or \g.
Your MySQL connection id is 50
Server version: 5.1.41-3ubuntu12.9-log (Ubuntu)

Type 'help;' or '\h' for help. Type '\c' to clear the current input statement.

mysql> use LinOTP2;
Reading table information for completion of table and column names
You can turn off this feature to get a quicker startup with -A

Database changed
mysql> FLUSH TABLES WITH READ LOCK;
Query OK, 0 rows affected (0.00 sec)

mysql> SHOW MASTER STATUS;
+------------------+----------+--------------+------------------+
| File             | Position | Binlog_Do_DB | Binlog_Ignore_DB |
+------------------+----------+--------------+------------------+
| mysql-bin.000001 |      106 | LinOTP2      |                  |
+------------------+----------+--------------+------------------+
1 row in set (0.00 sec)

mysql> UNLOCK TABLES;
Query OK, 0 rows affected (0.00 sec)
Also remember this “File” and “Position”.
9.10.5. Synching the machines
Now we setup the slave on both machines and tell them, where their master is at the moment.
On linotpserver1 we do:
mysql> stop slave;
Query OK, 0 rows affected (0.00 sec)

mysql> change master to master_host='linotpserver2', master_user='repl1_user', master_password='secretPW', master_log_file='mysql-bin.000001', master_log_pos=106;
Query OK, 0 rows affected (0.22 sec)

mysql> start slave;
Query OK, 0 rows affected (0.00 sec)
The master_log_file and the master_log_pos are the values from linotpserver2!
On linotpserver2 we do:
mysql> STOP SLAVE;
mysql> change master to master_host='linotpserver1', master_user='repl2_user', master_password='secretPW' master_log_file='mysql-bin.000001', master_log_pos=106;
mysql> START SLAVE;
The master_log_file and the master_log_pos are the values from linotpserver1!
You may check the status with:
mysql> show slave status;
If an error is displayed check the /var/log/syslog and /var/log/mysql/error.log for more details.