4. Installing Authentication Modules
An authentication module will talk a standard authentication protocol to the
application at which the user shall authenticate and on the other side it will
talk the HTTP protocol to the LinOTP Server. The authentication modules
communicate to the LinOTP Server via interfaces like /validate/check and
/validate/simplecheck. For more information on the interfaces see
Authentication interfaces.
At the moment there are the following authentication modules available:
pam_linotp
which can be plugged into the Unix PAM stack,
rlm_linotp2
which plugs into FreeRADIUS server to enable all RADIUS-Application to authenticate against LinOTP.
Alternatively there is the integration into the Radiator RADIUS Server, a
script for the rlm_perl module to run with FreeRADIUS 1 and a
module to integrate LinOTP into simpleSAMLphp.
On the Internet you can also find a module to use LinOTP with Wordpress 2 and a module to do two factor authentication with Apache 3.
pam_linotp and rlm_linotp2 are implemented in C and need to be compiled for your platform. See below for instructions.
4.1. Enabling PAM authentication with pam_linotp
The pam_linotp is contained in the package LinOTP-2.x-.tar.gz.
Unpack the package and change to the directory auth_modules.
Unpack LinOTPAuth.tar.gz and change to LinOTPAuth/libpam-linotp/src/.
Run the commands:
libtoolize
aclocal
automake –add-missing
autoconf
./configure
make
make install
This will install the PAM module to /lib/security/pam_linotp.so. You are
now ready to use pam_linotp within your PAM stack.
Note
Depending on your distribution you will need to install a package
like libpam-devel or libpam0g-dev to be able to compile
the PAM module.
Note
Alternatively if your pamd supports the handling of python
modules, you can use the pip python pam module.
4.1.1. Configure pam_linotp
pam_linotp can be used in any way in the pam auth facility. If you want to be
able to switch OTP authentication easily on and off for each service and your
distribution supports PAM includes like /etc/pam.d/auth-common, you may
adapt the auth-common easily and create a file /etc/pam.d/auth-linotp:
auth [success=1 default=ignore] pam_linotp.so debug url=https://localhost/validate/simplecheck
auth    requisite                       pam_deny.so
auth    required                        pam_permit.so
pam_linotp knows the following parameters:
debug
pam_linotp supports the debug flag to produce debug output.
url
The url parameter defines, where your LinOTP server is located. Leave /validate/simplecheck unchanged unless you exactly know, what you are doing.
nosslhostnameverify
The hostname of the LinOTP Server is not checked to match the common name in the certificate when doing SSL.
nosslcertverify
The validity of the certificate of the LinOTP Server is not checked.
realm=<yourRealm>
The user to authenticate is only searched in this realm. This parameter is optional. Here you may enter the name of one of the realms you configured.
resConf=<special UserIdResolvers>
The user to authenticate is only searched in this UserIdResolver. This parameter is optional. Here you may enter the name of one of the UserIdResolvers you configured.
loguser
If set to “no”, no usernames will be logged in the log file. The default is “yes”.
logpassword
If set to “yes” also passwords will be logged in the log file. The default is “no”.
4.2. Enabling RADIUS authentication with rlm_linotp2
rlm_linotp2 is an authentication module for the FreeRADIUS server. It can not be compiled alone. When introducing new modules to FreeRADIUS you need to compile the complete FreeRADIUS server. Thus you also need to get the rlm_linotp2 as source code.
Currently we only support FreeRADIUS 2.x .
Debian based systems (last tested on Ubuntu 14.04 and Debian 8 Jessie):
Install some dependencies:
sudo apt-get install git devscripts ssl-cert libcurl4-openssl-dev
sudo apt-get install debhelper dh-autoreconf autotools-dev libtool \
   libltdl-dev libssl-dev libpam0g-dev libmysqlclient-dev libgdbm-dev \
   libldap2-dev libsasl2-dev libkrb5-dev libperl-dev libpcap-dev \
   python-dev libsnmp-dev libpq-dev libtool-bin
Get the LinOTP repository:
git clone https://github.com/LinOTP/LinOTP.gitCheckout the latest release:
cd LinOTP
git tag --list release/* | sort -V | tail -1
# e.g. release/2.7.2
git checkout release/2.7.2
Build the packages:
cd auth_modules/src/freeradius
make deb
View the result and install the packages:
ls sandbox/*.deb
sudo dpkg -i sandbox/freeradius-common_*.deb
sudo dpkg -i sandbox/libfreeradius2_*.deb
sudo dpkg -i sandbox/freeradius_*.deb
# If you want to use 'radclient' also install sandbox/freeradius-utils_*.deb
The following are generic instructions for building FreeRADIUS. If you are using Debian/Ubuntu see above.
Get FreeRADIUS 2.1.x – either as source from the project 5 or as source packages from your distribution.
For compiling FreeRADIUS and rlm_linotp2 you need at least gcc, make, libtool, libssl-dev (or openssl-devel) , libcurl-dev (or libcurl-devel) and depending on your module selection further libraries.
Unpack the FreeRADIUS source.
Unpack LinOTP-2.x.tar.gz.
You need to copy the source directory of rlm_linotp2
auth_modules/freeradius/src/rlm_linotp2to the source directory of the FreeRADIUS modules. All modules reside infreeradius-server-2.1.x/src/modules/.Within the FreeRADIUS source directory you need to add rlm_linotp2 to the file
src/modules/stable. This file holds all modules that will be compiled with FreeRADIUS.For compiling the FreeRADIUS please refer to the FreeRADIUS documentation. But you should be good with:
./configure && make clean && makecheck for the shared library files being created
rlm_linotp2-2.1.8.so,rlm_linotp2.so.You may now install the FreeRADIUS Server:
make install
4.2.1. Configuring rlm_linotp2
If you built and installed the Debian packages as described above then edit the
configuration file /etc/freeradius/modules/linotp. Otherwise either copy
the linotp2.conf example file found in the LinOTP Git repository under
auth_modules/src/freeradius/src/rlm_linotp2/linotp2.conf or the example
below to /etc/freeradius/modules/linotp or a similar location.:
linotp2 {
   validateurl = https://localhost/validate/simplecheck
   sslhostnameverify = yes
   sslcertverify = yes
   restrictusername = no
   realm = <yourRealm>
   resConf = <special UserIdResolver>
}
The valid options are:
validateurl
The url parameter defines, where your LinOTP server is located. Leave /validate/simplecheck unchanged unless you exactly know, what you are doing.
sslhostnameverify
Whether the hostname of the LinOTP Server is checked to fit the common name in the certificate when doing SSL.
sslcertverify
Whether the validity of the certificate of the LinOTP Server is checked.
realm=<yourRealm>
The user to authenticate is only searched in this realm. This parameter is optional. Here you may enter the name of one of the realms you configured.
resConf=<special UserIdResolvers>
The user to authenticate is only searched in this UserIdResolver. This parameter is optional. Here you may enter the name of one of the UserIdResolvers you configured.
restrictusername
If set to “yes” the username is checked if it only contains unharmful characters (letters, number and -_+.@). If set to “no” the characters in the username are not checked. This is possibly more dangerous but also allows to use unicode characters in the username. To test the FreeRADIUS Server setup you may issue a command like this:
echo "User-Name = koelbel@LOCAL, User-Password = 845788" | radclient -s -x 127.0.0.1 auth testing123
loguser
If set to “yes” the username is written to the log files. (default=yes).
logpassword
If set to “yes” the password is written to the log files. (default=no).
allowemptypassword
If set to “yes” the password can be empty. (default=no).
4.2.2. Activating rlm_linotp2
You need to configure rlm_linotp2 as the FreeRADIUS module to be used, e.g.
by setting it as the default authentication type in /etc/freeradius/users:
DEFAULT Auth-type := linotp2
Depending on from where you want to reach your RADIUS server you have to
configure /etc/freeradius/clients.conf.
4.2.3. Using rlm_linotp2 and SSL
If you are using sslcertverify = yes the certificate of the LinOTP server
will be check. For this the FreeRADIUS needs to access the complete
certificate chain of the root CA, possible intermediate CAs and issuing CA.
You need to put all these certificates into the folder /etc/ssl/certs and need
to create hash links 4 of those new certificates. The certificates
need to be in PEM format and should have the file suffix .pem or .crt. You may
use the command from the openssl package to create the hash links:
c_rehash /etc/ssl/certs
4.2.4. Testing rlm_linotp2
Make sure the radclient tool is installed and your LinOTP machine is set up
correctly. Verify you can reach your LinOTP machine (it could be localhost):
curl "https://linotp.example.com/validate/simplecheck?user=me@myrealm&pass=1234"
# You might need the --insecure option for curl

# You should get back a smiley :-) or :-/ with a transaction id if you are
# using a challenge-reponse token. If you get :-( something is wrong.
Make sure you configured clients.conf correctly so that you can reach the
RADIUS server. Per default this will only work on the same machine where you
are running RADIUS (i.e. 127.0.0.1).
Make sure the LinOTP URL in /etc/freeradius/modules/linotp is correct. Then
test it:
echo "User-Name = me@myrealm, User-Password = 1234" | radclient -s -x 127.0.0.1 auth testing123
If it isn’t working try restarting FreeRADIUS (e.g. sudo service freeradius
restart) in case you didn’t do it after making some configuration change.
4.2.5. Fail-over configuration for RADIUS
The rlm_linotp2 module supports the fail-over configuration of the FreeRADIUS server. For more information on this see the FreeRADIUS documentation 6.
The fail-over configuration will work like this, that you may set up the FreeRADIUS server this way, that the rlm_linotp2 may talk to any number of LinOTP servers in a round robin like manner. So a simple redundant setup might look as in The RADIUS failover setup..
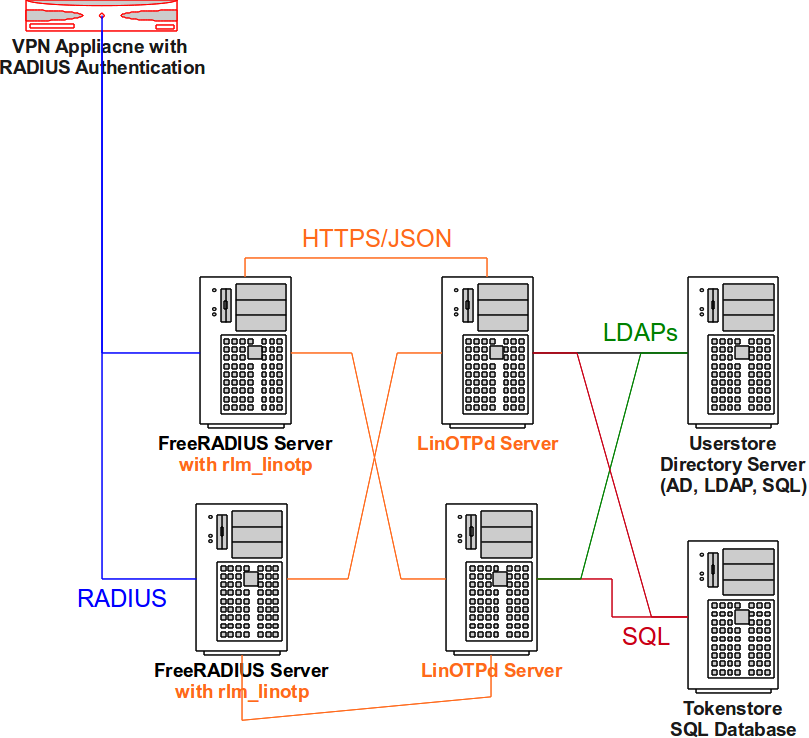
The RADIUS failover setup.
To configure such a redundant setup you need to modify two configuration files
of the FreeRADIUS server. In the file /etc/freeradius/modules/linotp you
define instances of the rlm_linotp2 module. Create an instance for each server
like this:
linotp2 LinOTPinstance1 {
       validateurl = https://linotp1/validate/simplecheck
       sslhostnameverify = yes
       sslcertverify = yes
}
linotp2 LinOTPinstance2 {
       validateurl = https://linotp2/validate/simplecheck
       sslhostnameverify = yes
       sslcertverify = yes
}
linotp2 LinOTPinstance3 {
       validateurl = https://linotp3/validate/simplecheck
       sslhostnameverify = yes
       sslcertverify = yes
}
Then you need to modify the file /etc/freeradius/sites-enabled/linotp and
define, that the Auth-Type LinOTP2 should use all these instances:
authenticate {
   Auth-Type LinOTP2 {
       redundant {
           LinOTPinstance1
           LinOTPinstance2
           LinOTPinstance3
       }
   }
[...]
}
4.3. Enabling RADIUS authentication with Radiator
Radiator 7 is a commercial highly configurable and flexible RADIUS server. It is written in Perl and thus can run on Linux, Unix, Mac OS X, Windows and VMS. Plugging LinOTP and Radiator together is fairly simple. Contact Open System Consultants Pty Ltd 8 to get your evaluation copy of Radiator.
To access LinOTP you will use the Authenticate Module AuthUrl. The Radiator configuration file could look like this:
<AuthBy URL>
 Identifier LinOTPURL
 Debug 1
 AuthUrl https://linotpserver/validate/simplecheck
 Timeout 5
 UserParam user
 PasswordParam pass
 UrlMethod GET
 BadPasswordKeyword ":-\("
 BadUserKeyword ":-/"
 AuthOKKeyword ":-\)"
 PasswordEncryption Clear
</AuthBy>
<Realm DEFAULT>
 AuthBy LinOTPURL
 AcctLogFileName ./detail
</Realm>
All users in the default realm will now be authenticated by LinOTP.
4.4. Enabling RADIUS authentication with rlm_perl
Note
In redundant enterprise environments we recommend using the rlm_linotp module.
Nevertheless, an easy alternative way to setup LinOTP with FreeRADIUS is to use
the FreeRADIUS module rlm_perl and the LinOTP module radius_linotp.pm.
On Ubuntu add the LinOTP PPA to your sources:
sudo add-apt-repository ppa:linotp/stable
On Debian add following to /etc/apt/sources.list (change the distro name
from wheezy to whatever applies). (See also
http://linotp.org/download.html#wheezy):
deb http://www.linotp.org/apt/debian wheezy linotp
Ubuntu/Debian: then install linotp-freeradius-perl:
sudo apt-get install linotp-freeradius-perl
On other systems you can download radius_linotp.pm from the LinOTP Git
repository (auth_modules/src/freeradius_perl/radius_linotp.pm) and copy it
to some location (e.g. /usr/lib/linotp/radius_linotp.pm). On these systems
you need to install freeradius and rlm_perl separately.
Then you need to configure rlm_perl as the FreeRADIUS module to be used,
e.g. by setting it as the default authentication type in
/etc/freeradius/users:
DEFAULT Auth-type := perl
Then you need to configure rlm_perl by telling it, where to find
radius_linotp.pm by configuring /etc/freeradius/modules/perl:
perl {
   module = /usr/lib/linotp/radius_linotp.pm
}
Now you need to configure the authentication of your site. The easiest way to
do this is to remove everything under /etc/freeradius/sites-enabled/ and
then to copy the file auth_modules/src/freeradius/src/rlm_linotp2/linotp
from the LinOTP Git repository to that directory. Then replace linotp2 with
perl in the authenticate block.
Alternatively start setting up /etc/freeradius/sites-enabled/linotp with
following content:
authenticate{
    perl
    [....]
Note
On certain distributions there are perl incompatibilities with the rlm_perl module, that ships with the FreeRADIUS. In these cases you need to preload the distinct version of your perl library like this:
  LD_PRELOAD=/usr/lib/libperl.so.5.10.1 freeradius -X

You should add the LD_PRELOAD to your start script.
4.4.1. Configuring radius_linotp.pm
The perl module reads a config file /etc/linotp2/rlm_perl.ini. It may look
like this:
URL=https://172.16.200.146/validate/simplecheck
REALM=lsead
RESCONF=lsead
Debug=True
SSL_CHECK=False
4.4.2. Testing rlm_perl
Test it just like rlm_linotp2 (see Testing rlm_linotp2 above) but making sure
the config in /etc/linotp2/rlm_perl.ini not
/etc/freeradius/modules/linotp is correct.
4.5. Enable SAML Identify Provider
Starting with 2.4 LinOTP integrates into simpleSAMLphp 9 as an Identity Provider. simpleSAMLphp is a pluggable solution for the SAML and shibboleth protocol. It can run as a Service Provider and as an Identity Provider. In the later case LinOTP provides a module to enable simpleSAMLphp to authenticate users with one time passwords against LinOTP. The LinOTP SAML module comes with the following files:
linotp2/
linotp2/linotp2.json
linotp2/docs/linotp2.txt
linotp2/lib/Auth/Source/linotp2.php
which need to be copied to the simpleSAMLphp modules directory. The
authentication module is then addressed by linotp2:linotp2. See the file
docs/linotp2.txt for configuring the module. For setting up simpleSAMLphp
as a SAML Identity Provider you may want to refer to the simpleSAMLphp
documentation 10.