11. Push Provider for KeyIdentity Push Token
Starting with version 2.9.1 LinOTP supports the KeyIdentity Push Token. This token provides a very convenient way to to secure logins and transactions. The user starts the login procedure (e.g. by entering username and password). The login program contacts the LinOTP server and LinOTP sends a push message to the user’s phone via a PNP proxy (Push Token Provider) provided by KeyIdentity GmbH. The user confirms the login (or transaction) at the KeyIdentity Authenticator App (available for Android and iOS). The mobile transmits this approval back to the LinOTP server. The LinOTP server checks the result and tells the login program whether the login is allowed or not. Besides the very convenient work flow for the user (no OTP must be entered, just confirm action via APP) the approval by the user is exactly for the displayed login (or transaction) and can only be used for this purpose.
Traditional OTPs are universal - any can be used for any kind of login which makes them potentially vulnerable (e.g. an attacker getting hands on an event based token for a short moment can pregenerate a number of OTPs which can be used for any 2FA secured login procedure of this user+token).
The KeyIdentity Push Token is fully supported by the KeyIdentity Authentication Provider (KAP).
Note
KeyIdentity GmbH provides the required infrastructure for the Push Token for their customers.
11.1. Configuration
For using the KeyIdentity Push Token at least one “Push Token Provider” must be configured and policies have to be set accordingly as described in: Setup KeyIdentity Push Token.
The Push Token Provider configuration can be found at the token management GUI (https://LINOTPSERVER/manage) “LinOTP Config” –> “Provider Config” –> “Push Provider Config” where the Providers can be created, edited and deleted.
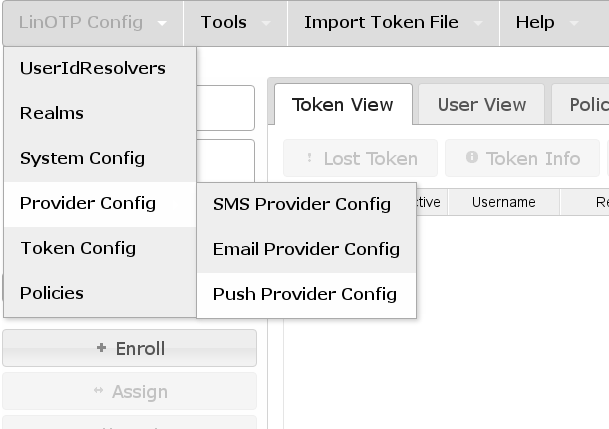
Access Push Provider Configuration
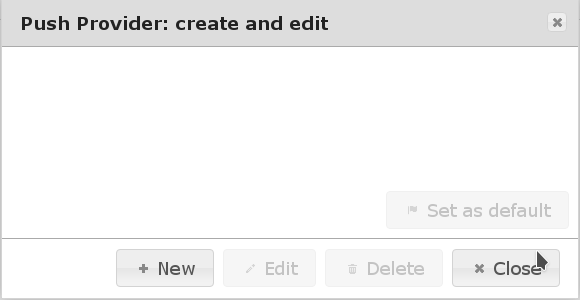
Create a new Push Provider
Set up as many Push Providers as required. Which one will be used can be configured by policies. If no policy exists or no existing policy applies the Push Provider marked as “(Default)” will be used.
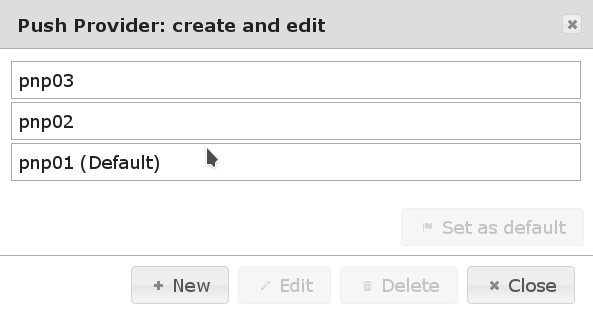
Multiple Push Provider configured
11.1.1. Policy to choose Push Provider
Different Push Provider can be used depending on username, realm or client.
- Policy name: this is a unique name of the policy.
- Scope: You need to set this to authentication.
- Action: push_provider=<NAME_OF_ONE_OF_THE_CONFIGURED_PROVIDERS>
- User: This is a comma separated list of usernames or resolver names. Please see Users in policies.
- Realm: Enter the name of the realm.
- Client: This is a list of IP addresses or subnets this policy is valid for.
11.1.2. Configure Push Provider
A Push Provider is a LinOTP module, that defines how the push messages are transmitted to the user’s phone.
Note
Push Token Provider, mobile APP (available for Android and iOS) as well as a compatible extension for the Windows login procedure (KAP) are provided by the KeyIdentity GmbH.
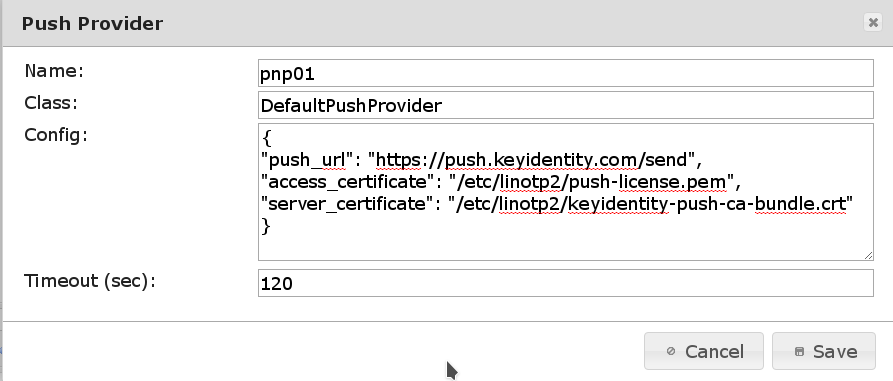
These four values can be configured in the server configuration:
Name- Name of the Push Provider as to be used in the policies.
Class- The Push Provider module to be used for sending messages. At the moment LinOTP comes
with one Push Provider class:
DefaultPushProvider Config- The configuration parameter for the Push Provider Class.
Timeout- This configuration key holds the time the challenge that was pushed to the user’s phone is valid. The number is interpreted in seconds. The default value is 120 i.e. 2 minutes. That means that after a confirmation message was sent a user will be able to approve this message within the next 2 minutes. If the push message arrives later or the user has not confirmed the login/transaction within 2 minutes, the challenge is not valid anymore.
11.1.2.1. Configuration details of the DefaultPushProvider
The Push Provider configuration itself contains three configuration items:
{
"push_url": "https://FQDN_PUSH_PROVIDER>/send",
"access_certificate": "FULLPATH_TO_CLIENT_CERTIFICATE",
"server_certificate": "FULLPATH_TO_PNPSERVER_CERTIFICATE"
}
push_url- holds the link to the API of the PNP server.
Example:
"push_url": "https://push.keyidentity.com/send"
access_certificate- points to the client certificate used to authenticate against the PNP server. For KeyIdentity’s PNP server this certificate is provided by KeyIdentity GmbH.
Example:
"access_certificate": "/etc/linotp2/push-license.pem"
server_certificate- points to the server certificate (or certificate chain) of the PNP server to ensure to communicate with the correct server. For KeyIdentity’s PNP server this certificate is provided by KeyIdentity GmbH.
Example:
"server_certificate": "/etc/linotp2/keyidentity-push-ca-bundle.crt"
Tip
If a new Push Provider is created it the configuration parameters are prefilled with the required data to connect to the PNP server provided by KeyIdentity GmbH.
Complete Push Provider Configuration
Note
The LinOTP server must provide a web server certificate accepted by the mobile the KeyIdentity Authenticator App is running at. So please make sure the certificate is signed by a trusted certificate authority.
11.2. Testing of the KeyIdentity Push Token
After the rollout and the successful activation of the token the authentication procedure can be tested via the API.
This requires two API calls to:
- trigger the push message
- check the confirmation of the push message
11.2.1. Trigger the Push Messages
The KeyIdentity Push Token is a challenge response token. The push message is triggered depending on the LinOTP configuration using the user’s name and the token PIN (which can be the user’s password if otppin=1 policy is in place).
The generic API call is:
https://LINOTP/validate/check?user=USERNAME[@REALM]&pass=TOKENPIN&data=TRANSACTIONDATA&content_type=0
Parameters:
LINOTP- The IP or FQDN of the LinOTP server, e.g.- https://linotp.example.net
user- The user’s name, can be USER@REALM if the user is not member of the- default realm
pass- The token PIN, depending on the configured otppin policy this can be either:- PIN of the token (otppin=0 / default behavior)
- Password of the user (otppin=1)
- empty (otppin=2)
data - The data of the transaction, e.g. details on the login
content_type - Needs to be 0 to trigger the challenge
This is an example with actual values:
https://linotp.example.net/validate/check?user=tux&pass=tHisIsthesECRetToKENPIN&data=Login to dc1.example.net&content_type=0
The LinOTP server returns the transaction details in case of a successful creation of the challenge. This contains the serial number of the token and the transactionid:
{
  "detail": {
     "linotp_tokenserial": "KIPT00031EDC",
     "transactionid": "353846450659",
     "message": "",
     "linotp_tokentype": "push"
  },
  "version": "LinOTP 2.9.1.3",
  "jsonrpc": "2.0802",
  "result": {
     "status": true,
     "value": false
  },
  "id": 0
}
The transaction should now be displayed in the KeyIdentity Authenticator App and be approved there by the user. The mobile communicates the result of the user’s decision back to the LinOTP server.
11.2.2. Check Result
The generic API call to fetch the result from the LinOTP server looks like this:
https://LINOTP/validate/check_status?user=USER&pass=OTPPIN&transactionid=TRANSACTIONID
Parameters:
LINOTP- The IP or FQDN of the LinOTP server, e.g.- https://linotp.example.net
user- The user’s name, can be USER@REALM if the user is not member of the- default realm
pass- The token PIN, depending on the configured otppin policy this can be either:- PIN of the token (otppin=0 / default behavior)
- Password of the user (otppin=1)
- empty (otppin=2)
transactionid- The transactionid as displayed in the return page of the- above push API call.
This is an example with actual values:
https://linotp.example.net/validate/check_status?user=tux&pass=tHisIsthesECRetToKENPIN&transactionid=353846450659
In return the status of the transaction is received.:
{   "detail": {
     "transactions"353846450659": {
        "": {
           "status": "open",
           "token": {
              "serial": "KIPT00031EDC",
              "type": "push"
           },
           "received_tan": true,
           "message": "",
           "received_count": 1,
           "valid_tan": true
        }
     }
  },
  "version": "LinOTP 2.9.1.3",
  "jsonrpc": "2.0802",
  "result": {
     "status": true,
     "value": true
  },
  "id": 0
}
In the output the “valid_tan”: true indicates that the transaction has been approved by the user.