5.7. Enrolling tokens
LinOTP is able to enroll several different tokens. These can be:
eToken NG-OTP
mOTP Tokens
HOTP, TOTP and OCRA Tokens
QR-TAN tokens
KeyIdentity Simple Pass Tokens
KeyIdentity QR Tokens
KeyIdentity Push Tokens
SMS OTP / Mobile TAN
Voice Token
Remote Tokens
Forwarding Tokens
RADIUS Tokens
YubiKeys
Static Password Tokens
E-Mail Tokens
Day OTP Tokens
5.7.1. Enroll eToken NG-OTP
Note
An eToken NG-OTP can only be enrolled using the command line client.
An eToken NG-OTP is a USB based token, that does not have a preinstalled HMAC key. The secret HMAC key is generated by the management client and installed to the token and stored in the token database without any person seeing this HMAC key.
For enrolling eToken NG-OTP you need to have the Aladdin/SafeNet PKI Client installed.
5.7.2. Enroll mOTP Token
LinOTP is also capable of using other OTP algorithms and thus supports many different tokens. So it is also possible to enroll mOTP Tokens which you can download at http://motp.sourceforge.net. These are time based open source OTP tokens that can be installed on a mobile phone. mOTP token apps exist for Android phones, the iPhone and also for older feature phones. You can find recommended mOTP apps for Android and iPhone in the section Recommended Mobile Apps.
Please refer to the project website on how to install the mOTP on your feature phone.
As to the app for the feature phone you may initialize the mOTP application at any time anew. Initializing mOTP means, that a new OTP key – in this case it is called Init-Key – is created on the mobile phone. This can be done by entering ‘0000’ when the mOTP application asks ‘Enter PIN:’. When you have installed the mOTP to your mobile or to the mobiles of all your users, each mobile needs to create its secret key.
In the LinOTP management client press the button “enroll”.
Choose the tokentype “mOTP”.
You need to enter the OTP key, that was generated on the mobile phone.
The user needs to make up a 4 digit passphrase, that he enters each time, when he wants to generate an OTP value on his mobile.
Note
This is the mOTP PIN. The mOTP PIN is the PIN that gets entered on the phone and is also used to calculate the OTP value. When you enter a wrong mOTP PIN on the phone, the phone will calculate a wrong OTP value. This must not be confused with the OTP PIN.
You may now press “OK” and the management client will generate a serial number for the token for you.
If you need to change the mOTP PIN later click “set PIN” in the WEB UI and choose “mOTP PIN”.

Setting the mOTP PIN in the Web UI
You may also want to set an “OTP PIN”, that the user needs to enter in front of the generated OTP value when he wants to authenticate.
The OTP value of mOTP tokens are validated by the epoch time. You may verify the epoch time on the LinOTP server to compare it to the time on the mobile phones using the command:
date +%s
1268661055
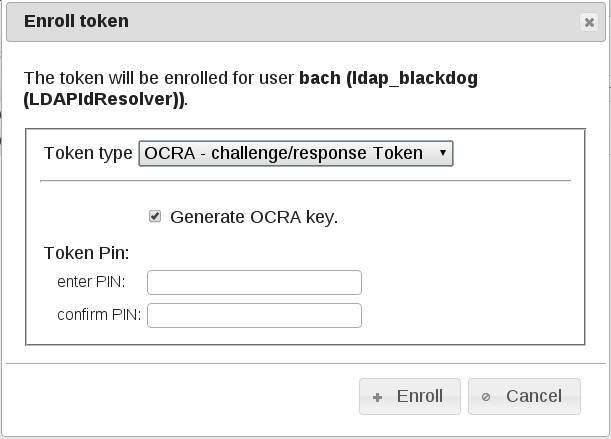
5.7.3. Enroll HOTP, TOTP and OCRA Tokens
You may realize, that there are several softtokens (e.g. for mobile phones) around that use the HOTP HMAC-Based One-Time Password Algorithm defined in RFC4226, TOTP (a variation of HOTP) Time-Based One-Time Password Algorithm defined in RFC6238 and OCRA OATH Challenge-Response Algorithm defined in RFC6287.
Some of these tokens generate the HMAC secret key during an initialization process.
Select one of these tokens to register and create an HMAC secret key/Seed during initialization.
If necessary, select the user in userview for whom the token should be rolled out.
- Choose one tokentype:
HOTP - HMAC eventbased
TOTP - HMAC time based
OCRA Token
Enter the secret, that was generated by the token. Or generate a random seed.
For HOTP and TOTP, you can use: Google Authenticator compliant. This sets some defaults like the OTP-Length which are known to work well with the Google Authenticator app.
Enter Token Pin to secure your Token (optional, you can change them later)
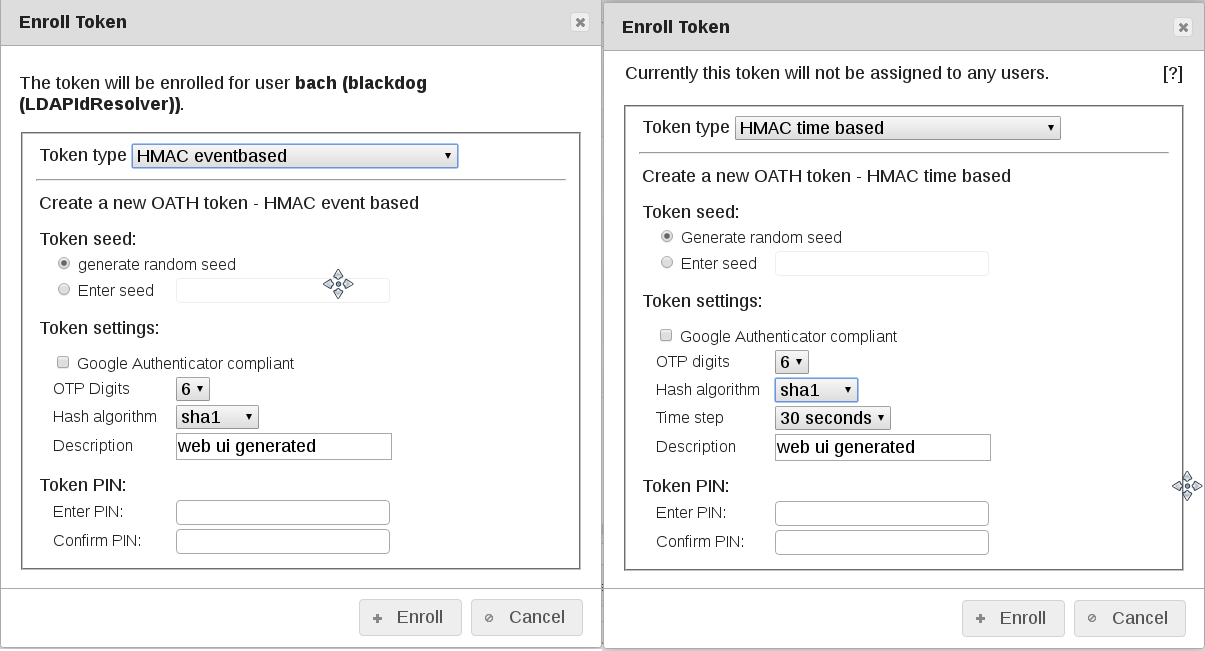
Enroll OATH token with the Web UI
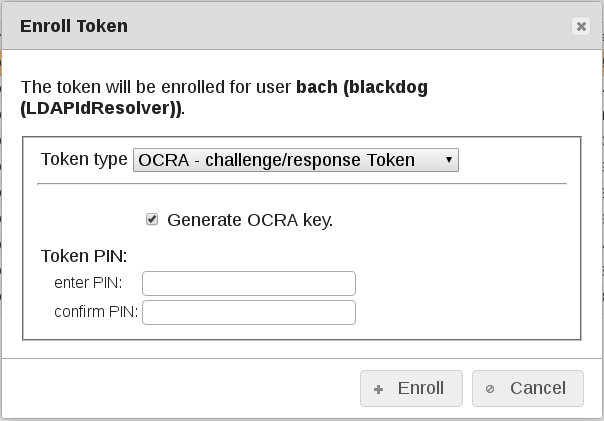
Enroll OCRA token with the Web UI
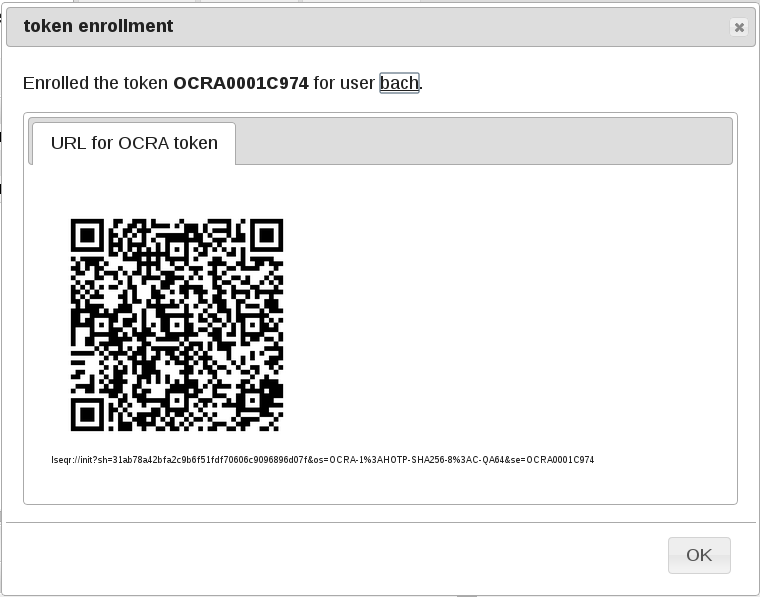
But the Web UI offers additional functionalities and is the recommended management tool. The Web UI can have the LinOTP server generate the HMAC seed. Some Apps like the Google Authenticator, the Android token or OATH token can import this seed using a QR code.
The LinOTP server can generate such a QR code.
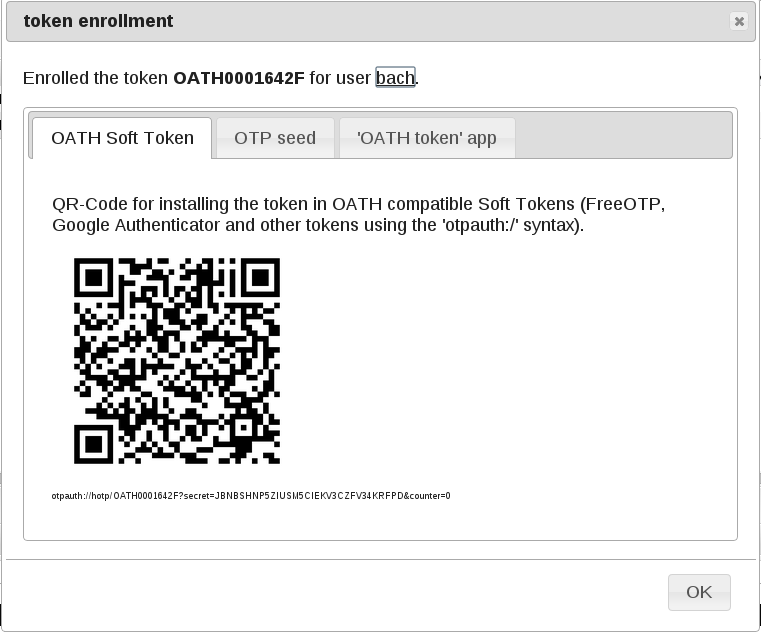
Enroll a Google Authenticator using a QR code
The QR code is scanned with the app on the mobile phone and the mobile can be used as token.
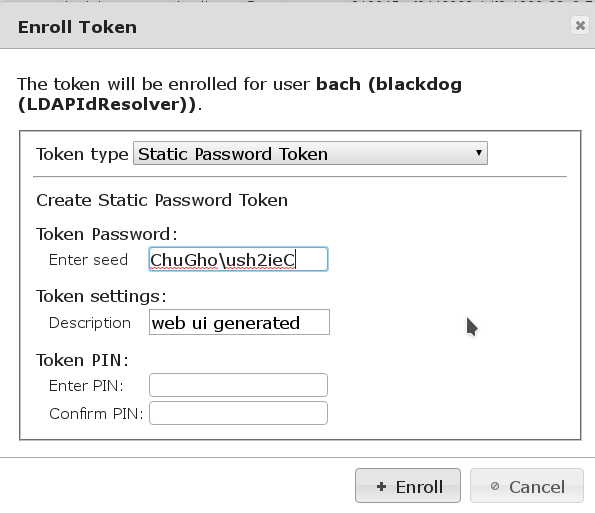
5.7.4. Enroll Static Password Token
This token allows a users to authenticate with a fixed password instead of an OTP.
In some cases it might be necessary that users authenticate without a one time password, but rather with a fixed password. This may be, if your authentication client is not capable of routing users to OTP authentication and other users to password authentication or in cases, where a user may have lost his OTP generator or to allow temporary logins for externals. A PIN can be set and the PIN policy applies.
Note
Please be aware: this is a very weak second factor and possibly compromises the security.
Choose the static password token:

Enter the password used as OTP:
5.7.5. Enroll KeyIdentity Simple Pass Token
The Simple Pass Token is a special version of the static password token. Instead of setting a password the OTP value is empty and the PIN of the token can be considered to act as password. So the usefulness of this special type of token highly depends on the overall authentication infrastructure and the OTP PIN policy.
To enroll a Simple Pass token
choose the tokentype “SPass”
push the button “OK”.
If you do not set an OTP PIN now, the user will get successfully authenticated ALWAYS! So you now should set an OTP PIN for this token. The user may now authenticate against LinOTP by providing only this PIN.
5.7.6. Enroll SMS OTP / Mobile TAN
To enroll an SMS OTP token
choose the tokentype “SMS”.
If you selected a user and this user has a mobile phone number defined in the user store, this phone number will be automatically entered in the phone number field. You may of course change this.
Press OK and the token with this mobile phone number is created and assigned to the selected user.
Note
If you need to change the phone number later, you can do this in the tokeninfo dialog. To be able to change the phone number a policy scope:admin,action:set must be configured. See Admin Policies for more details.
For a convenient rollout of SMS token Linotp provides (starting from version 2.7.2.2) the command line tool linotp-enroll-smstoken. It can be used to rollout and assign token to a single user, to users in a certain realm or even for all users which have a mobile number stored in their UserIdResolvers.
Available parameters for linotp-enroll-smstoken:
--linotp:           the linotp url (required)
--admin:            the token admin user - will prompt for the admin password
--username:         the username filter (optional)
--realm:            the realm filter for the user selection (optional)
--no-ssl-verify     supress the verification of the ssl certificate
Example: rollout SMS token for a single user
linotp-enroll-smstoken --linotp https://LINOTP --admin TOKENMANAGER --username
USER
Example: rollout SMS token for all users in a realm which have a mobile number assigned to
linotp-enroll-smstoken --linotp https://LINOTP --admin TOKENMANAGER --realm
REALM
Note
If you use KeyIdentity LinOTP Smart Virtual Appliance 1.2 or older the script will be installed (/usr/bin/linotp-enroll-smstoken) but can not be executed due to library version conflicts. Please copy the script to a machine running a recent distribution of linux and start it from there.
5.7.7. Enroll Voice Token
Prerequisites
A Voice Challenge Service has been set up (available for KeyIdentity customers only).
A Voice Provider is defined.
Policies for the voice token are created.
To enroll a Voice OTP token
Choose the token type “Voice”.
If a user is selected and this user has a mobile phone number defined in the user store, this phone number will be automatically entered in the phone number field. The number can be changed.
If OK is pressed the token with this mobile phone number is created and assigned to the selected user.
Note
The use of the Voice Challenge Service is included in a corresponding support contract. Please contact support@keyidentity.com for help and documentation KeyIdentity GmbH provides the required infrastructure for the Voice Token for their customers.
5.7.8. Enroll Remote Token
A Remote Token forwards the authentication request to another LinOTP server. So the calculation of the One Time Password is not done on the first LinOTP server, where the User is authenticated but on the remote LinOTP server. The Remote Token can be defined this way, that only a serial number and the OTP value is forwarded to the remote server. This token with this serial number needs to be located on the remote server of course.
Thus, a remote server can hold all OTP tokens without knowing any users and without having any tokens assigned to any users. On such a remote server not even a UserIdResolver needs to be defined.
The authenticating LinOTP (first) server will do no OTP calculation and thus will not know any secret keys (HMAC keys) since it forwards all requests to the remote server. To enroll a Remote Token just choose enroll and then the token type “Remote Token”.
Then you need to enter the remote LinOTP server and the serial number of the token on the remote server.
Alternatively you can specify a user on the remote LinOTP server, if the token is assigned to a user.
Note
If you specify “https://localhost” as the remote server, you can assign one single physical token to several users, by pointing the Remote token to a local token of another user.
You may choose if the checking of the PIN is done locally or remotely.
Check PIN remotelyDo not set a PIN on the local LinOTP server. The entered credentials will be completely forwarded to the remote LinOTP server. The PIN that was set on the remote server will be used to authenticate the user.
Check PIN locallyIn this case, the PIN on the local LinOTP server is verified. If the PIN on the local server matches, the remaining part of the credentials will be sent to the remote server. On the remote server NO PIN should be set for the token, otherwise authentication might fail. In this scenario a remote server can hold one physical OTP token with no PIN, while all the Remote Token on the local machine get individual PINs and can be assigned to different users.
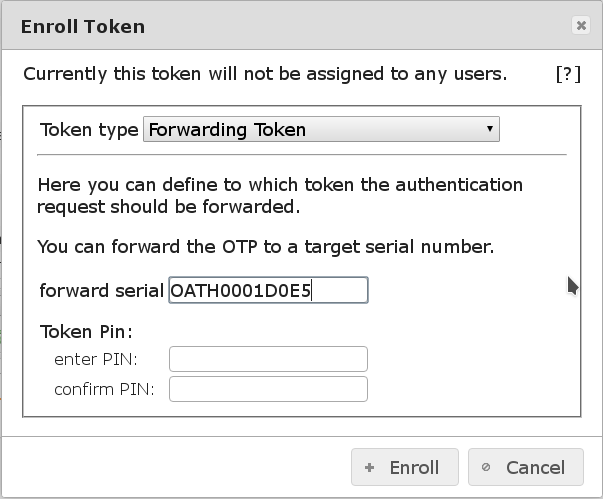
5.7.9. Enroll Forwarding Token
The Forwarding Token is the simple form of the Remote Token. It can be used to share the same token between different users. The main difference to the Remote Token is that the referenced token must be at the same LinOTP server. Configuration is very simple - just point to the serial number of the desired token. PIN policy etc. is applied for the authenticated user.
5.7.10. Enroll RADIUS Token
A RADIUS Token can forward the authentication request to another RADIUS server. This can be any kind of RADIUS server.
Note
The RADIUS token can be well used for migrating existing RADIUS scenarios.
A RADIUS Token consists of
the RADIUS server name
plus the port,
the username on the RADIUS server and
the RADIUS shared secret.
You may also define, if the OTP PIN is checked locally on the LinOTP server or if the complete password is forwarded to the RADIUS server.
Choose “enroll” and then choose the token type “RADIUS Token”. Enter the RADIUS server name including the port and the other required information.
Check PIN locallyIf the OTP PIN is checked locally, you also need tospecify the length of the potential OTP value, i.e. how many characters of the password will be split and sent to the RADIUS server.
Check PIN on RADIUS serverIf you choose to check the PIN on RADIUS server the complete credential will be sent to the RADIUS server.
5.7.11. Enroll KeyIdentity QR Token
The KeyIdentity QR Token can be either enrolled via API or the self service portal. The enrollment consists of two steps:
Pairing: The first part of the token is transferred to the user’s mobile via a QR code. This contains the required the information for the activation process.
Activation: The token on the user’s phone is activated.
Please see Setup KeyIdentity QR Token for details.
Note
Please note - the KeyIdentity Authenticator APP is required which is available for iOS and Android.
Transactions and logins are validated by the user’s phone. The login program (like the KeyIdentity Authentication Provider) displays a QR code which is scanned with the KeyIdentity Authenticator APP (available for Android and iOS). The user approves the action on the phone and the login / transaction is validated by LinOTP. The QR Token features an offline mode in case the mobile or the login program can not contact the LinOTP server (e.g. in an airplane).
A case study as a complete example can be found here: Application Scenario with the KeyIdentity QR Token
5.7.12. Enroll KeyIdentity Push Token
The KeyIdentity Push Token can be either enrolled via API or the self service portal. The enrollment consists of two steps:
Pairing: The first part of the token is transferred to the user’s mobile via a QR code. This contains the required the information for the activation process.
Activation: The token on the user’s phone is activated.
Please see KeyIdentity Push Token Policies for details about the required policies and Push Provider for KeyIdentity Push Token how to configure the needed Push Token Provider.
Note
Please note - the KeyIdentity Authenticator APP is required which is available for iOS and Android.
Transactions and logins are validated by the user’s phone. The login program (like the KeyIdentity Authentication Provider) triggers a push message to the KeyIdentity Authenticator APP (available for Android and iOS). The user approves the action on the phone and the login / transaction is validated by LinOTP.
A case study as a complete example can be seen here: Application Scenario with the KeyIdentity Push Token
Note
The use of the Push Challenge Service is included in a corresponding support contract. Please contact support@keyidentity.com for help and documentation KeyIdentity GmbH provides the required infrastructure for the Voice Token for their customers.
5.7.13. Enroll QR-TAN Token
A QR-TAN Token is a special OCRA Token that can be enrolled via a QR code process and where the challenge is also transmitted via a QR code. You can either start the QR enrollment via the API (/admin/init) or you can start the enrollment of the QR Token via the management web UI.
Note
Please note, that you need the KeyIdentity QR-TAN App which is available on request for iOS and Android.
Select a user and press the button “Enroll Token”.
Start enrolling a QR Token
The displayed QR code needs to be scanned with the users smartphone. Alternatively you can print the QR code and hand it over to the user.
LinOTP generated the initial shared secret and the QR code
In a second step the user needs to login to the Selfservice Portal and go to the tab “Activate your QR token” and select the corresponding token. The user needs to enter the activation code, which is displayed on his smartphone and then needs to scan the second QR code, which is displayed in the selfservice portal.
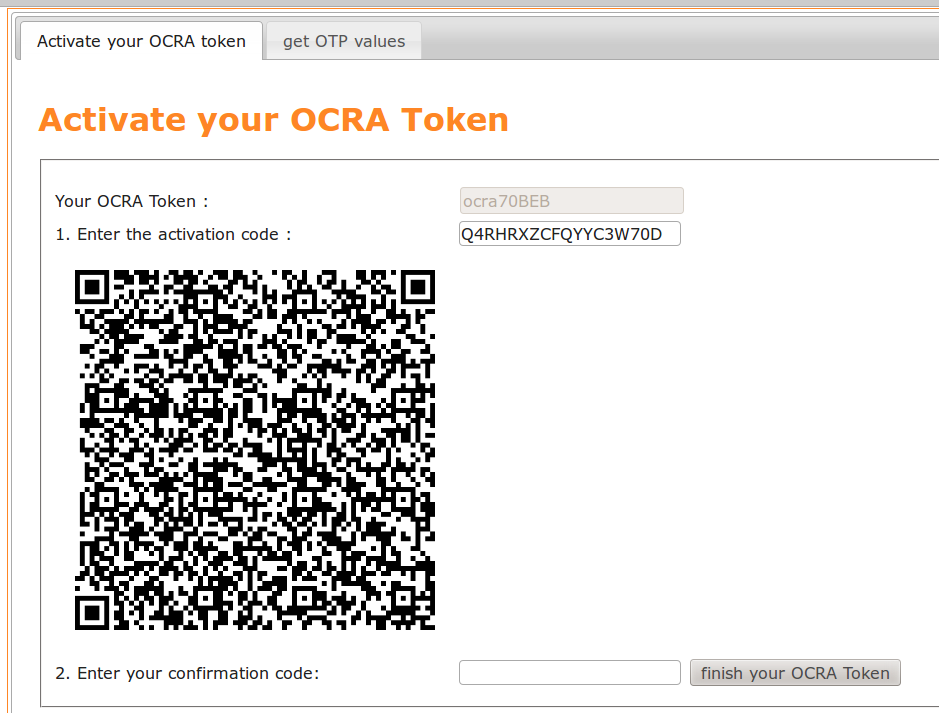
Finalize QR Token enrollment
Now the QR Token is enrolled and ready for use.
5.7.14. Enroll YubiKeys
Note
If you want to enroll YubiKeys on Windows, you first need to install additional software: Yubico Personalization Tools
LinOTP supports the YubiKey in all these modes:
OATH/HOTP mode - which outputs a 6 digit number according to RFC 4226,
Yubico mode - which uses Yubicos own AES-based mode and outputs a 32 characters long OTP value,
Static mode - which outpus a static password,
Cloud mode - which is the Yubico mode, that is not validated by LinOTP but the request is forwarded to the Yubico Cloud service.
Challenge Response mode - which is used by as TOTP mode by the YubiKey NEO NFC.
The OATH mode, Yubico mode and the Challenge Response mode can be programmed to either slot 1 or slot 2 1 of the YubiKey.
5.7.14.1. Enrolling OATH/HOTP mode
The OATH/HOTP mode is identified by the token type “HMAC”, since internally the OATH algorithm is used.
The prefix for the serial numbers is “UBOM”. “OM” stands for OATH mode.
The YubiKey in OATH mode can be enrolled either from the management GUI or from the command line client:
linotpadm.py -U https://localhost --admin=admin -C yubikey_mass_enroll --yubimode=OATH --yubislot=1
This will enroll a YubiKey OATH mode to slot 1.
Note
The serial number that is stored in LinOTP’s database is read from the YubiKey hardware. So if you enroll the same token a second time, it will not create a new token object in LinOTP but will overwrite the old token object.
5.7.14.2. Enrolling Yubico mode
The Yubico mode is identified by the token type “yubikey”.
The prefix for the serial numbers is “UBAM”. “AM” stands for AES mode, since internally this algorithm uses AES.
The YubiKey in Yubico mode can only be enrolled using the command line client in mass enrollment:
linotpadm.py -U https://localhost --admin=admin -C yubikey_mass_enroll --yubimode=YUBICO \
             --yubislot=2 --yubiprefixserial
You can choose whether the Yubico mode should be programmed to slot 1 or slot 2. In this example the serial number of the YubiKey is also prefixed in front of the output.
Note
The serial number that is stored in LinOTP’s database is read from the YubiKey hardware. So if you enroll the same token a second time, it will not create a new token object in LinOTP but will overwrite the old token object.
Note
You can in fact enroll a YubiKey in OATH mode in one slot and in Yubico mode in the other slot, which will result in two token objects in LinOTP, which also could be assigned to two different users.
5.7.14.3. Enrolling static mode
The YubiKey also can emit a static password. The YubiKey static mode is identified by the token type “pw” 2.
The prefix for the serial numbers is “UBSM”. “SM” stands for static mode.
The YubiKey in static mode can only be enrolled using the command line client in mass enrollment:
linotpadm.py -U https://localhost --admin=admin -C yubikey_mass_enroll --yubimode=STATIC \
             --yubislot=1
You can choose whether the static mode should be programmed to slot 1 or slot 2.
Note
The serial number that is stored in LinOTP’s database is read from the YubiKey hardware. So if you enroll the same token a second time, it will not create a new token object in LinOTP but will overwrite the old token object.
Note
You can in fact enroll a YubiKey in OATH mode or YUBICO mode in one slot and in static mode in the other slot, which will result in two token objects in LinOTP, which also could be assigned to two different users.
5.7.14.4. Enrolling Cloud mode
The Cloud mode is identified by the token type “yubico”.
The prefix for the serial numbers is “UBCM”. “CM” stands for Cloud mode.
The YubiKey in Cloud mode can be enrolled via the Selfservice Portal or the management web UI. To enroll via the Selfservice Portal the policy action “enrollYUBICO” needs to be set.
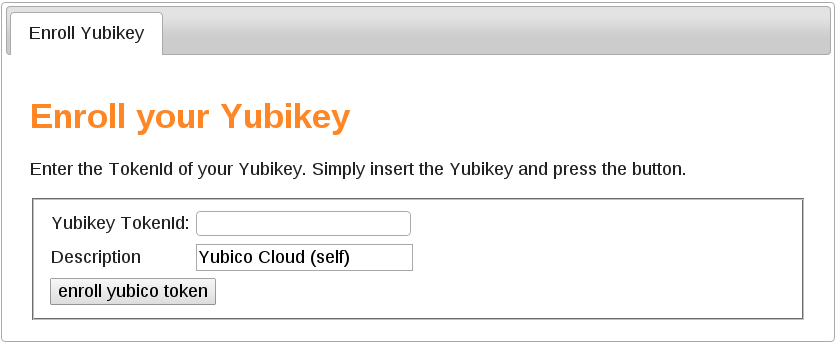
Enroll YubiKey in Cloud mode in the Selfservice Portal
The YubiKey is used as it comes from Yubico’s factory. The authentication is forwarded to the Yubico cloud service. To assign the YubiKey to the user, the user needs to go to the Selfservice Portal and position the cursor in the entry field “TokenId”, insert the YubiKey and just needs to push the button on the YubiKey. The 12 first characters of the usual 44 characters output is the TokenId. LinOTP will only take the first 12 characters, even if 44 characters are entered.
Note
As the token object in LinOTP gets assigned a new random serial number, enrolling the same YubiKey again will create a second token object in LinOTP, which of course could be assigned to a different user.
5.7.14.5. Enrolling Challenge Response mode
The Challenge Response mode is identified by the token type “TOTP”.
The prefix of the serial numbers start with “UBOM”, as this is also an OATH mode.
To enroll a Challenge Response mode run:
linotpadm.py -U https://localhost --admin=admin -C yubikey_mass_enroll \
                                  --yubimode=OATH --yubislot=1 --yubiCR
Note
The serial number of the token in the LinOTP database will be read from the YubiKey hardware. So if you enroll the same token a second time, it will overwrite the token object in the token database.
Footnotes
- 1
The YubiKey has two slots, that can hold different content. The first slot is used by pressing the button shortly, the second slot is used by pressing the button for about 3 seconds.
- 2
The token type “pw” is a static password that can be prepended with an OTP PIN. This token type is also used in the lost token scenario.
5.7.15. Enroll E-Mail Token
To enroll an e-mail token
Choose the tokentype “email”.
If you selected a user and this user has an e-mail address defined in the user store, this address will be automatically entered in the e-mail field. You may of course change this.
Press OK and the token with this e-mail address is created and assigned to the selected user.
Note
Make sure you have the appropriate config entries: E-mail Provider for E-mail Token